Last reviewed against the official Google Play Console and Android Developers documentation. Play Console labels and device-lab behaviour can change, so confirm the current position on the official pages linked at the end of this article.
Upload a release to Google Play and, capacity permitting, Google installs your app on a set of real Android devices, launches it, and lets an automated crawler explore it for several minutes. You get back a report listing crashes, compatibility problems, performance measurements and accessibility findings — before a single user sees the build.
It is one of the most underused tools in Play Console, for two opposite reasons. Some developers never open it. Others open it, see a list of findings, and either panic or dismiss the whole thing. Neither reaction gets value from it: the report is not a verdict, it is a set of observations that need interpreting.
This guide covers what the report does, how to read its severity labels, how to investigate a crash or ANR, how to configure test credentials so the crawler reaches more of your app, what to do when no report appears, and how to prioritise what you find.
Quick answer: what the report does, and what it cannot guarantee
The short version
- It runs automatically when you upload an app bundle or save a release to a production track — subject to capacity in Google's device lab. It is not on-demand.
- It covers four areas: stability, Android compatibility, performance and accessibility.
- Findings are graded as errors, warnings or minor issues, with a clean state meaning nothing was found on the devices that ran.
- It is a safety net, not a guarantee. Google states it cannot guarantee testing will identify all issues.
- A finding is not automatically a blocker, and a clean report is not an approval. Neither predicts the review outcome.
- It does not replace manual testing. The crawler explores a small fraction of what a real user journey covers.
What is the Google Play pre-launch report?
A pre-launch report is Google's automated test of your uploaded app, run on Android devices in a test lab, with findings compiled into a report in Play Console. It surfaces problems before the build reaches users.
Two facts about its availability matter most, and Google states both directly. Reports are generated automatically, subject to capacity within Google's device lab. And they run on app bundle upload and again when you save a release to the production track. That explains why a report sometimes appears within minutes and sometimes not at all: the trigger is automatic, but the resource is shared.
One more thing before diving in. The crashes and ANRs found happen on test devices, and Google notes they do not affect your app's crash statistics. The report is a diagnostic tool, not a metric users or reviewers will see.
How the automated test process works
The mechanism is simple to describe, and knowing it explains most of the report's quirks.
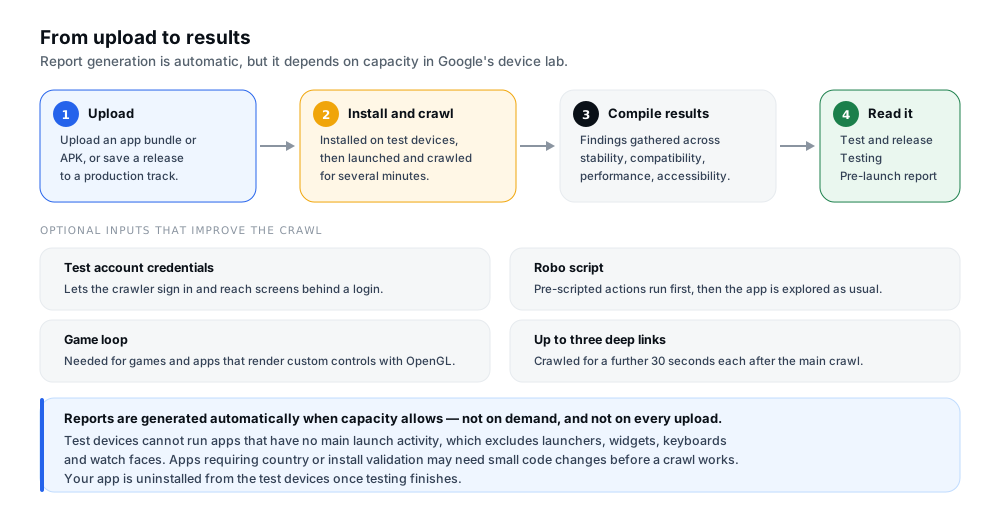
Figure 1 — Reports are generated automatically when capacity allows, not on demand.
After you upload an app bundle or save a release to the production track, Google installs it on Android devices in a test lab, then launches and crawls it for several minutes. The crawler types, taps and swipes; you can supply custom tests or credentials to guide it. Results are compiled and your app is uninstalled.
Several documented details shape what you can expect:
- Device selection is deliberate and variable. Google weighs popularity, crash frequency, screen resolutions, manufacturers and OS version. The set may differ between tests, so results are not perfectly comparable run to run.
- The set covers phones, tablets, Wear OS and desktop devices such as Chromebooks, but apps cannot be tested directly on Android Automotive OS or Android TV devices.
- It starts at Android 9, so compatibility conclusions apply only to the range tested.
- Your own exclusions carry over. Devices you excluded from targeting in your manifest are excluded here too.
- Orientation follows your app. Devices default to portrait, but an app locked to landscape comes back in landscape.
- It is powered by Firebase Test Lab, which Google points developers at to choose specific test devices.
Two categories of app the crawler cannot handle
No main launch activity means no test. Test devices cannot run apps without a main launch activity — Google names launchers, widgets, keyboards and watch faces. If your app is one of those, an absent report is expected rather than a fault.
Some apps need small code changes first. Google notes certain apps may require minor modifications before a crawl can work, naming country validation and install validation. Licensing is a related case: the app fails the licensing check on test devices and sits unlicensed, though you still receive results; Google suggests a closed version with licensing services disabled.
What types of issues can the report find?
The report groups findings into four areas, and expectations most often need adjusting here. Coverage is real but partial: it reflects what a crawler could reach in a few minutes.
Stability. Crashes, ANRs, defective libraries and unsupported APIs — usually the most actionable, because a crash arrives with a stack trace.
Android compatibility. Interfaces outside the public Android SDK, often called unsupported or non-SDK interfaces. They appear on the Overview and Stability tabs, graded by severity.
Performance. Per-device measurements: average CPU, memory, network bytes sent and received, and frames per second where a game loop made that available.
Accessibility. Content labelling, touch target size, implementation issues and low contrast, each tied to screens in your app.
The Screenshots tab also distinguishes devices that were unavailable during testing from devices genuinely incompatible with your bundle. Unavailable means your bundle works there but the test went wrong, and Google suggests uploading another bundle. Incompatible means your declared requirements exclude that device — a finding about your configuration, not a test failure.
How to find the report in Google Play Console
The report lives under the testing tools for a selected app. Google documents the path as Test and release > Testing > Pre-launch report, with an Overview view and a separate Settings page. Play Console navigation has been reorganised before, so if your menu differs, look under your app's testing section rather than assuming the feature is gone.
The Overview view summarises the errors, warnings and minor issues found, categorised by issue type, plus a launch recommendation. Treat that as a summary of the automated test, not a decision about your release.
The Settings page holds everything configurable: test account credentials, Robo scripts, game loops, deep links and language preferences. These persist, so saved credentials are reused for future tests unless you edit or remove them.
How to read errors, warnings, and minor issues
The report grades findings, and the grade is the most misread part of the tool. An icon colour tells you how serious the finding looked during testing — not what happens next.
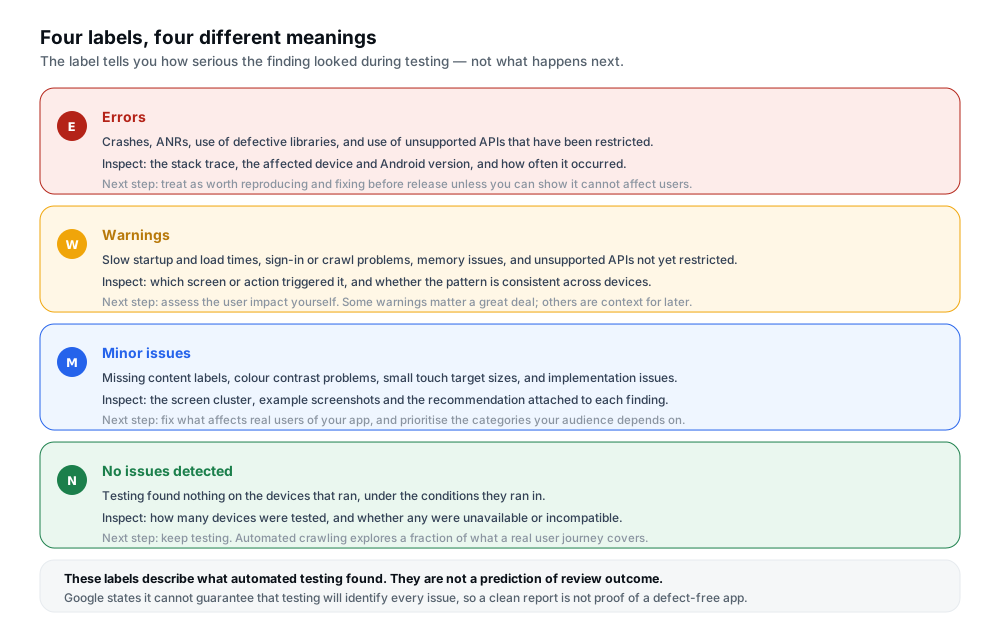
Figure 2 — Four labels, four different meanings. None of them predicts the review outcome.
| Label | What it generally indicates | Evidence to inspect | Recommended next step |
|---|---|---|---|
| Error | Crashes, ANRs, defective libraries, restricted unsupported APIs. | Stack trace, affected device and Android version, relevant API, frequency. | Try to reproduce. Fix unless you can show it cannot affect real users. |
| Warning | Slow startup and load times, sign-in or crawl problems, memory issues, not-yet-restricted APIs. | Which action triggered it, performance graphs over time, whether it repeats across devices. | Assess user impact and decide. Some are worth fixing now; others are context. |
| Minor issue | Missing content labels, colour contrast, small touch targets, implementation issues. | The screen cluster, example screenshots with device details, the attached recommendation. | Fix what affects real users — these land hardest on people who depend on them. |
| No issues detected | Testing found nothing on the devices that ran, in the conditions they ran in. | How many devices were tested, and whether any were unavailable or incompatible. | Keep testing. Absence of findings is not absence of bugs, and Google says so. |
Two errors of interpretation are common enough to name. Treating every warning as a blocker delays releases for findings that may not affect your users: sign-in and crawl issues are only warnings, and a crawl issue often says more about the crawler than your app. Conversely, ignoring warnings wholesale throws away genuine signals — slow startup and memory issues are warnings, and both have real user consequences.
Read each finding as a question rather than a verdict: what would have to be true for this to matter to a real user?
How to investigate crashes and ANRs
Crashes and ANRs deserve the most attention because they arrive with evidence attached. For each issue the Stability tab gives you the issue type and icon, the number of devices detected on, the stack trace, the relevant API where applicable, and how often it occurred.
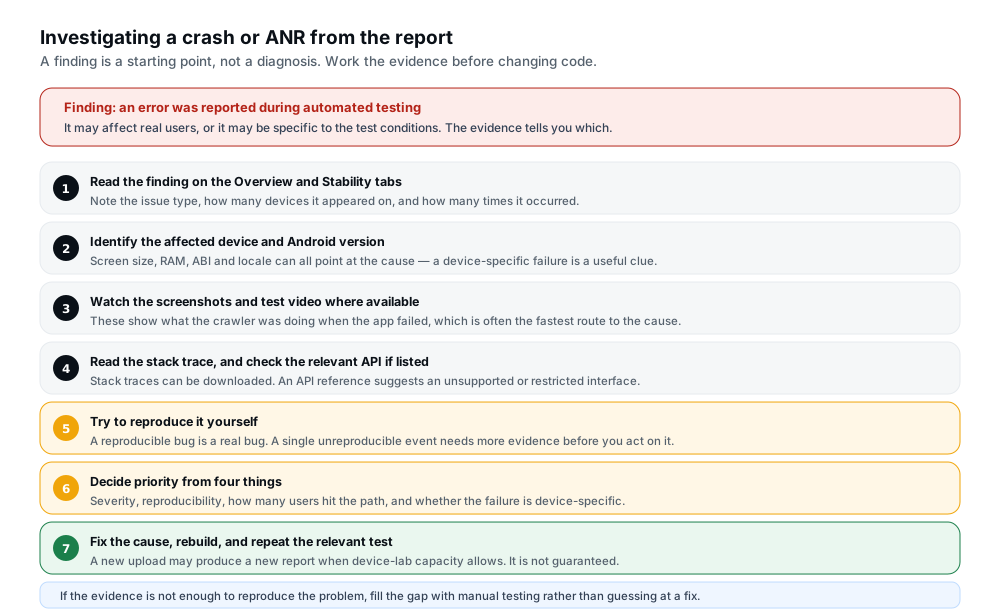
Figure 3 — A finding is a starting point, not a diagnosis. Work the evidence before changing code.
Selecting Show more reveals the device name, screen size, Android version, RAM, ABI and locale. Selecting a device model adds specifications, a screenshot and video, demo loop output, and downloadable stack traces — though availability may vary between reports.
Working that evidence in order turns a finding into a fix:
- Note the spread. An issue on one device out of twenty is a different problem from one on all of them.
- Identify the device and Android version. RAM, ABI and locale can each point at a cause — a failure confined to one density is a clue, not noise.
- Watch the video and screenshots to see what the crawler was doing when your app failed.
- Read the stack trace — downloadable, and it names the failing code path. If a relevant API is listed, that points at an unsupported interface rather than your logic.
- Try to reproduce it, separating a real bug from a test artefact.
- Fix the cause, rebuild, and repeat the test. A new upload may produce a report when capacity allows — not guaranteed.
Non-SDK interface findings have their own priority order
If your app uses interfaces outside the public Android SDK, errors and warnings appear on the Overview and Stability tabs. A View issues link sits next to those OS compatibility findings, and a down arrow next to each interface shows where it is called. One interface can be called many times in a single test, so one finding may cover several call sites.
Google grades these by severity and publishes a suggested order of priority, worth following literally: restricted interfaces, which will break on some or all versions of Android; then unsupported with restriction imminent, which are not guaranteed to behave and will be restricted in an upcoming Android release; then unsupported with restriction not imminent, which are simply not guaranteed to behave.
Within each category Google orders them by frequency, a useful second tiebreaker. If replacing them all immediately is not realistic, that order at least tells you which ones are on a timer.
How to review performance and compatibility findings
The Performance tab reports per-device measurements rather than a single score, which is why it repays reading device by device.
For each device model the summary includes average CPU as a percentage of usage by your app, average memory, average network bytes sent and received, and average frames per second — the last only for tests using game loops. Google also notes some older Android versions may not generate performance data, so gaps are not necessarily your app's fault.
Drilling into a device model is where the value is: performance statistics, performance over time, and a graph of each metric, alongside the screenshot and video. Google's own example is the one to copy — if you notice a CPU spike, look at what the crawler was doing then and work back to the responsible screen.
For compatibility, the two Screenshots tab lists described earlier are worth reading carefully. Unavailable devices suggest re-uploading and testing again, because your bundle is compatible with them. Incompatible devices are a statement about your declared requirements: re-testing will not produce results, so that list doubles as a review of which devices your manifest excludes.
One further note: demo loops produce no Screenshots data. You can group results by screen clusters, which collects similar screenshots across devices, or by devices, which shows one device's screenshots chronologically. Screen clusters is the default and better for spotting a layout that breaks on a particular density or language.
How to understand accessibility results
Accessibility findings are the most commonly skipped and the most fixable, because each comes with a screenshot and a recommendation. Android's guidance also notes that accessibility features benefit all users, not only those with a disability.
The Accessibility tab splits findings into four documented categories: content labelling, where elements are labelled incorrectly for screen readers; touch target size, where elements do not meet the recommended size; implementation, meaning layout issues that can make an app difficult to use for people with motor impairments; and low contrast colour issues.
Results are grouped by screen clusters identifying where the issues were found. The icon gives the grade: red for errors, yellow for warnings, blue for minor issues, green check when a category came back clean. Selecting a cluster shows example screenshots with the device model, operating system, screen size, screen density and language, plus a recommendation.
That is what makes these findings actionable: you are shown the specific screen, on a specific device, in a specific language, with a suggested fix.
Two points of context. The categories weight differently depending on your app — content labelling matters enormously for a screen-reader user and not at all for a purely visual app, while touch target size affects anyone using it one-handed. And automated checks are one input among several: Android's guidance points at Material Design guidelines, the Accessibility Scanner and automated checks together, framing them as a way to find improvements rather than a completeness test.
How to configure test credentials and customize automated tests
Everything here is optional, configured once on the settings page, and reused for future tests. It is also where the largest single improvement in report quality comes from: a crawler that cannot get past your sign-in screen tests almost nothing.
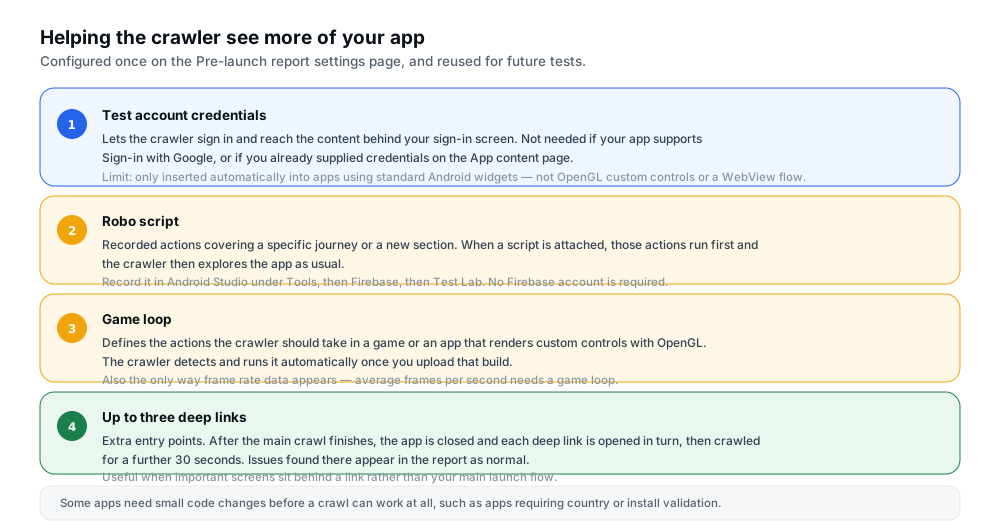
Figure 4 — Optional inputs that decide how much of your app the crawler actually reaches.
Test credentials, and why they must be dedicated
If your app has a sign-in screen and you want the crawler to test it or what lies behind it, provide account credentials. You do not need them if your app supports Sign-in with Google — the crawler logs in automatically — or if credentials are already on the App content page.
Do not use real personal or administrative credentials
Google states that credentials are used for testing purposes only, and that while it does its best to keep them secure, it recommends not adding official credentials. Create a dedicated test account instead — one that reaches no customer data, changes no billing and holds no administrative permissions, so a leak exposes only a disabled throwaway.
You enter them in the Test-account credentials section of the settings page as a username and password. Saved credentials are reused until you edit them; switching to Don't provide credentials removes them, and you must add new ones before any future test can sign in.
One technical limit explains many "the crawler still did not get in" reports. Credentials can only be inserted automatically into apps using standard Android widgets, not apps that render custom controls with OpenGL or use a WebView for authentication. If your sign-in is a WebView, no configuration will help — itself a useful finding about how testable that flow is.
Robo scripts and game loops
A Robo script controls the steps the crawler takes, for example to cover a common user journey or a new section. With a script attached, the crawler runs your pre-scripted actions first, then explores as usual — so it guarantees coverage of the path you care about without cutting the crawl short.
Record one in Android Studio under Tools > Firebase > Test Lab > Record Robo Script, then upload it from the settings page. No Firebase account is needed.
For games and OpenGL apps, Google's guidance is that you need a game loop to get a good report. It defines the actions you want the crawler to take, and you can test more than one in the same app. The setup is in your code — launch the loop, run it, optionally close it — after which the crawler detects and executes it automatically. It is also the only route to frame rate data.
Deep links and language preferences
You can add up to three deep links to test additional entry points. After the main crawl, the app closes and each link is visited in turn, crawled for a further 30 seconds each; issues found there appear in the report as normal. It is the cheapest way to cover screens that sit behind a link.
Language preferences sit on the same page, up to five. If you select none, Google picks where your app has the most installs. One sequencing detail catches people out: because the report runs automatically on upload, language preferences can only be added after the initial test completes, and later tests show results only for the languages you selected.
Why a report may be missing, delayed, or incomplete
An absent report is a common source of confusion, and the first thing to internalise is that it does not automatically mean something is wrong with your app.
Report generation depends on capacity in Google's device lab: reports are generated automatically based on overall capacity, with the operative qualifier "where capacity permits". When the lab is busy, your upload may not produce a report at all — a resource decision, not a judgement about your build.
A sensible troubleshooting sequence, in order:
- Confirm the correct artefact was uploaded. A report is tied to a specific upload, so one for an older version tells you nothing.
- Check the current status and available details — something may be running, partially complete, or listed with an error rather than genuinely absent.
- Re-read the documented guidance. Confirm your app is one the crawler can test at all; a missing main launch activity, or a country or install validation requirement, changes the picture entirely.
- Allow reasonable time. Google publishes no fixed turnaround, so treat any specific number you read elsewhere — including here — as unreliable.
- Try another supported attempt, or use another testing route meanwhile. A further upload is the normal trigger, and Firebase Test Lab lets you choose devices directly using the same infrastructure underneath.
Two related situations deserve separating. If some devices were unavailable, you have a report — it just has gaps. If a report is incomplete because the crawler stopped early or never got past a login screen, that is a coverage problem with a configuration fix, not a missing report: credentials, a Robo script or deep links are usually the answer.
And worth stating plainly: a failed or unavailable report is not proof that your app is defective. It is an infrastructure outcome, and treating it as a verdict on your build misreads the tool.
How to prioritise fixes before release
A report can return dozens of findings, and treating them all as equally urgent is how it becomes a source of paralysis rather than confidence. Four factors sort them quickly.
Severity, as the report grades it. Errors over warnings over minor issues — with one qualification: the grade reflects what happened during testing, so an unreproducible error may rank below a warning you can reproduce on demand.
Reproducibility. The highest-value discriminator. A bug you can reproduce is one you can fix and verify; one you cannot is a research task, not a code change.
How many users would hit the path. A crash in your main flow matters more than a finding on a screen nobody opens. You know your traffic patterns; the report does not.
Compatibility risk. Non-SDK interfaces are the clearest case, because Google publishes a priority order for exactly this reason. Restricted interfaces break on some or all Android versions, making them a timer rather than a preference.
Common findings and the next step for each
| Problem or finding | Possible explanation | Evidence to inspect | Recommended next step |
|---|---|---|---|
| App crashed during testing. | A real defect, or a path your own testing never reached. | Stack trace, device and Android version, screenshot and video. | Reproduce on a similar configuration, fix the cause, rebuild and repeat. |
| ANR, or a screen that stops responding. | Main-thread work under load, or a blocking call a faster device hides. | The crawler's action, CPU and memory graphs for that device, the stack trace. | Investigate on the slower device first — that is where the timing problem shows. |
| Sign-in screen the crawler could not pass. | No credentials provided, or a flow credentials cannot automate. | Whether credentials are configured, how far the report got, whether sign-in uses a WebView or OpenGL. | Add dedicated test credentials. If the flow cannot be automated, use a Robo script and manual testing. |
| No report, or results delayed. | Usually device-lab capacity. Occasionally an app the crawler cannot run. | Whether the uploaded artefact is the expected one, and whether your app has a main launch activity. | Allow time, then try another upload. Use Firebase Test Lab meanwhile. Absence is not a defect. |
| Accessibility findings. | Missing or incorrect content labels, small touch targets, layout issues, low contrast. | The screen cluster, example screenshots, and the recommendation attached. | Fix the clusters affecting your users most, then re-check with the Accessibility Scanner. |
| Unsupported API warnings. | Non-SDK interfaces that are not guaranteed to behave. | The severity category — restricted, imminent, or not imminent — plus call-site stack traces. | Work in Google's published priority order and remove the dependency where you can. |
| Performance concerns, such as a CPU or memory spike. | A resource-heavy screen, a leak, or work that could be deferred. | The metric plotted over time, and what the crawler was doing when it rose. | Correlate the spike with an action, reproduce it, and measure again after the fix. |
| Device-specific compatibility problem. | Either a genuine incompatibility, or a device the test could not use. | The Screenshots tab lists, which separate unavailable devices from incompatible ones. | Re-upload if devices were merely unavailable. If genuinely incompatible, review your manifest exclusions. |
A workable sequence for most releases: reproducible crashes and ANRs in paths real users take, then restricted and restriction-imminent non-SDK interfaces, then reproducible warnings with clear user impact, then accessibility findings your users depend on, then any accidental device incompatibility, then the remainder — recorded and revisited rather than silently dropped. A finding you defer with a note is a managed decision; the same finding ignored is a surprise waiting to happen.
A practical pre-release testing checklist
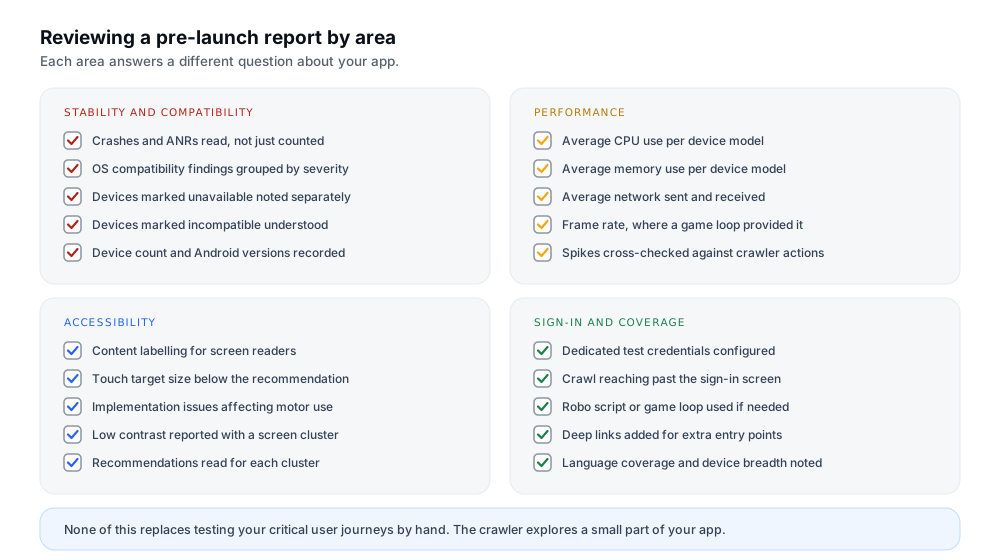
Figure 5 — Four areas, each answering a different question about your app.
- Confirmed the correct release artefact was uploaded and that the report relates to it.
- Reviewed all available stability findings, including device spread and frequency.
- Investigated crashes and ANRs using video, screenshots and stack traces before changing code.
- Checked Android compatibility findings and noted their severity category.
- Reviewed performance results where available, per device rather than in aggregate.
- Checked accessibility findings, screen cluster by screen cluster.
- Verified the sign-in flow with suitable test credentials — and confirmed the crawler got past it.
- Inspected screenshots, videos and stack traces for anything you cannot explain.
- Tested critical user journeys manually, because the crawler will not have covered them all.
- Fixed high-impact reproducible problems and identified the cause rather than suppressing the symptom.
- Repeated the relevant tests after fixing, rebuilding and re-uploading if a new report is warranted.
- Confirmed the app is ready for the next release step — a clean report is one input, not a finish line.
Frequently asked questions
What is the Google Play pre-launch report?
An automated test Google Play runs on your uploaded app. It is installed on Android devices in a test lab, crawled for several minutes, and the findings are compiled into a report covering stability, compatibility, performance and accessibility.
How do I find the pre-launch report in Play Console?
Under Test and release > Testing > Pre-launch report, which has an Overview view and a separate Settings page. Play Console navigation has changed before, so look in your app's testing section if your menu differs.
What is the difference between an error and a warning?
Errors cover crashes, ANRs, defective libraries and restricted unsupported APIs. Warnings cover slow startup, sign-in or crawl problems, memory issues, and APIs not yet restricted. The grade reflects automated testing, not your release outcome.
Does a clean pre-launch report guarantee app approval?
No. A clean report means testing found nothing on the devices that ran, in the conditions they ran in, and Google states it cannot guarantee testing will identify all issues. Approval and policy review are separate processes.
Why is my pre-launch report missing or delayed?
Usually device-lab capacity. Reports run automatically on upload or when saving a production release, where capacity permits — so a missing report is a resource outcome rather than a verdict on your build. It is also expected if your app has no main launch activity, or needs code changes to pass country or install validation.
How can I help automated testing get past my app's sign-in screen?
Provide credentials on the Pre-launch report settings page, using a dedicated test account. This is not needed if your app supports Sign-in with Google, or if credentials are already on the App content page. Credentials only work automatically in apps using standard Android widgets — not OpenGL controls or a WebView authentication flow.
Can the pre-launch report find every crash?
No. The crawler types, taps and swipes for several minutes on a selected set of devices, exploring a fraction of your app's surface. Crashes needing a specific sequence, account state, or an unreached screen will not appear.
Should I fix every warning before release?
Not necessarily. Slow startup and memory warnings have real user impact; crawl or sign-in issues may say more about the crawler's coverage than your app. Assess each one and record your reasoning.
What should I do after finding an issue in the report?
Work the evidence before touching code: identify the affected device and Android version, review screenshots and video, read the stack trace and any relevant API, then reproduce it. Prioritise by severity, reproducibility, user reach and compatibility risk.
Official resources and further reading
- Google Play Console Help — Use a pre-launch report to identify issues — how reports are generated, the crawl process, app suitability, test credentials, Robo scripts, game loops, deep links, language preferences and generation limits.
- Google Play Console Help — Understand your pre-launch report — the report overview, error and warning categories, Stability tab details, non-SDK interface severity order, performance metrics, accessibility categories and screenshot views.
- Android Developers — Build accessible apps — the accessibility pathways for design, development and testing, and the tools and guidelines Android points developers at.
- Android Developers — Android vitals — the counterpart to pre-launch testing: what happens to stability and performance signals once your app is live with real users.
- Firebase Test Lab documentation — the infrastructure the pre-launch report runs on, and the route to choosing your own test devices.
For the wider testing picture, testing your app across different devices covers building a device matrix and the manual methods that complement this report. If your app requires sign-in, providing sign-in details for review covers the separate requirement that reviewers reach the parts of your app behind a login — the same problem the crawler has, with a different audience.
Conclusion
The pre-launch report is best understood as a free, automatic, partial safety net. It installs your app on real devices, lets a crawler loose in it, and hands you crashes with stack traces, per-device performance numbers, accessibility findings with screenshots, and a list of devices your configuration excludes — a lot of signal for the cost of reading it.
It is not a quality gate, and Google is careful to say so: testing cannot catch everything, a clean report is not proof of a defect-free app, and a missing report is a capacity outcome, not a verdict on your build. Read it as evidence, not as a grade.
Three habits get the most from it. Configure it before you need it — credentials, and a Robo script or game loop where your app needs one, decide whether the crawler reaches anything meaningful at all. Work the evidence before changing code, because a finding you cannot reproduce is a research task rather than a fix. And keep testing by hand, because the crawler taps and swipes for a few minutes on a handful of devices, and your users will do considerably more.
Preparing an app for release?
12 Testers Community helps Android developers run a managed closed test with real testers who stay opted in for the full required testing period, alongside guides for the rest of the Play submission process. The pre-launch report is yours to read and act on: no testing service can configure it for you or take over responsibility for fixing what it finds, and nothing here guarantees approval, production access or ranking.