
Last reviewed against the official Android Developers and Google Play Console documentation. Publishing requirements can change, so confirm the current position on the pages linked at the end.
Two file types confuse first-time Android publishers more than anything else. One ends in .aab, the other in .apk, and they look like competing options for the same job. They are not. One is the format you upload to Google Play; the other is the format that gets installed on a device.
Mixing them up has a cost. A developer who does not know the difference may send an app bundle to a tester and find it will not install, or build an APK to publish an app and find Google Play will not accept it. Neither mistake is about code — both come from treating a publishing format as an installable package.
This guide separates the two, explains what Google Play does with the file you upload, and walks through building, testing and uploading a release for both native Android and Flutter projects. Signing keys and version codes appear only as supporting details, since each has its own documentation.
Quick answer: which format should you upload to Google Play?
The short version
- Upload the app bundle — the
.aabfile — for a new app or an update on Google Play. It is the publishing format Google Play expects. - An app bundle cannot be installed directly. Users install APKs. Google Play generates those APKs from your bundle for each device configuration.
- APKs still matter. They are what you use for local testing, sideloading, direct distribution and internal sharing.
- You build one file. You no longer build, sign and manage a separate APK for every screen density, CPU architecture or language.
- Neither format is obsolete. Each is the right tool at a different stage — bundle to publish, APK to test and share.
What is an APK file?
An APK is the package format Android installs. Android requires that all APKs be digitally signed with a certificate before they can be installed or used to update an existing app, which is why an unsigned APK will not install at all.
An APK is a single self-contained package: everything the app needs — compiled code, resources, assets and its manifest — travels together inside it. That self-containment is what makes it useful, since you can hand the file to a device and install it. It is also what makes it a blunt instrument, because one APK must carry resources for every device it might land on, including screen densities, CPU architectures and languages a particular phone will never use.
That makes the APK the natural artefact for local development, a quick install on a test device, and distributing an app outside a store.
What is an Android App Bundle?
An Android App Bundle is a publishing format that includes all your app's compiled code and resources, and defers APK generation and signing to Google Play. That sentence from Android's documentation contains the whole distinction, so it is worth reading twice.
An app bundle is a file with the .aab extension that you upload to Google Play. It is a signed binary that organises your app's code and resources into modules, and it is deliberately not an installable package. Google Play then uses the bundle to generate the APKs served to users.
The format differs from an APK internally in ways that make that deferral possible: modules appear as top-level directories; each module's AndroidManifest.xml and DEX files are stored separately rather than merged; and protocol buffer metadata describes each module's contents so a store can work out what a device needs.
AAB vs APK: main differences
Table A is the reference comparison. Figure 1 is the same distinction as a diagram.
| Attribute | Android App Bundle (.aab) | APK (.apk) |
|---|---|---|
| File extension | .aab |
.apk |
| Main purpose | A publishing format you upload. APK generation and signing are deferred to Google Play. | An installable package format. It is what Android installs and updates. |
| Typical Google Play workflow | Upload one signed bundle. Google Play builds and serves the APKs for each device. | New apps must be published with an app bundle. APKs are not the publishing format for a new app. |
| How installation packages are generated | A base APK, feature module APKs and configuration APKs, generated from your bundle. | You build each APK yourself and sign it with your own key. |
| Suitability for direct installation | No. Users install APKs, not bundles, so you cannot simply install a bundle as you would an APK. | Yes. This is the format installed directly on a device. |
| Device-specific optimisation | Automatic. A device receives only the code and resources it needs for its configuration. | Manual. You decide what each APK contains, and you manage the variants yourself. |
| Typical development and testing use | Not the usual artefact for a local install. Test it with the official bundle tooling or through a Play track. | Local testing, sideloading to a device, direct distribution and internal sharing. |
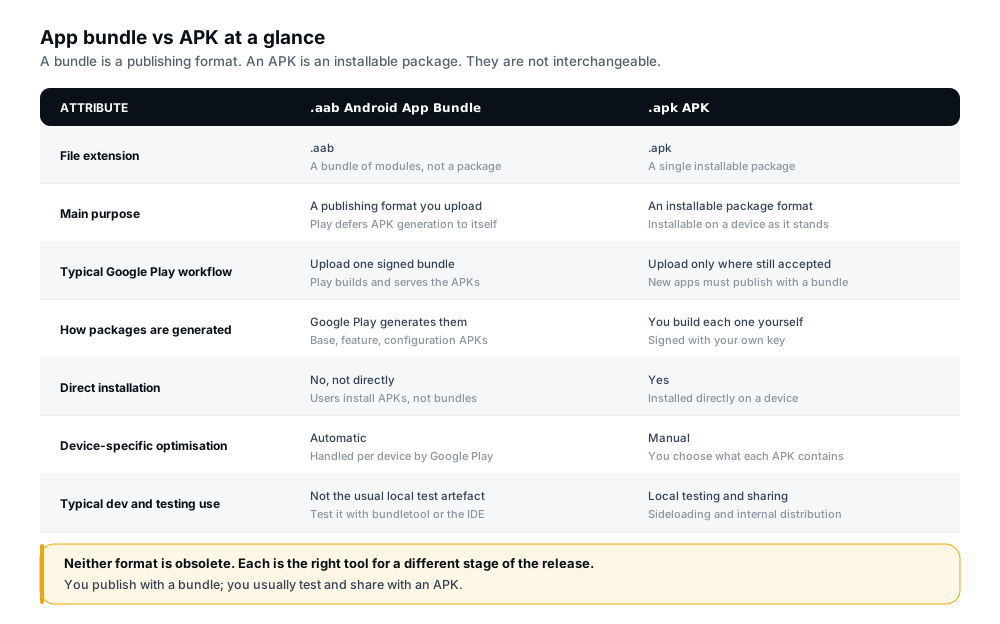
Figure 1 — A bundle is a publishing format; an APK is an installable package. They are not interchangeable.
How Google Play turns an app bundle into device-specific APKs
Google Play uses your bundle to generate and serve optimised APKs for each device configuration, so only the code and resources needed for a specific device are downloaded. Several kinds of APK come out of that process.
The four kinds of APK Google Play generates
The base APK contains code and resources every other split APK can access, and provides your app's basic functionality. It is installed first, because only the base APK's manifest carries the full declaration of your app's services, permissions, platform version requirements and system feature dependencies.
Configuration APKs each hold native libraries and resources for one specific screen density, CPU architecture or language, and a device installs only those that match it. You never create these — follow the standard convention for organising configuration-specific resources and Google Play generates them automatically.
Feature module APKs carry code and resources for parts of your app you have modularised, which lets you control how and when each one is delivered.
Multi-APKs cover devices that cannot use split APKs at all, since split APKs require Android 5.0 (API level 21) or higher. For Android 4.4 (API level 19) and lower, Google Play serves a single multi-APK optimised for that device but still containing all languages — though it cannot later download feature modules on demand.
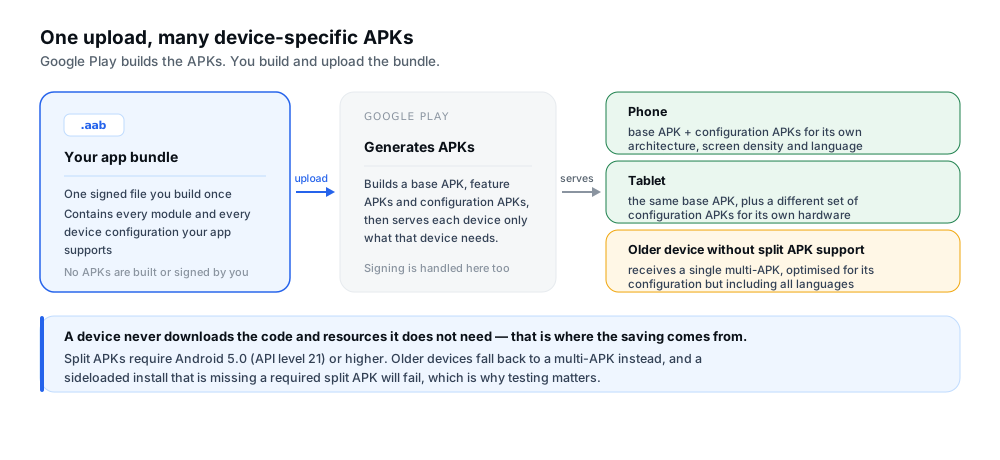
Figure 2 — One upload, many device-specific APKs. Google Play builds them; you never do.
The mechanism behind this is the split APK system. Split APKs are much like regular APKs, but the Android platform can treat several installed split APKs as a single app — sharing code and resources and appearing as one install. Instead of one monolithic APK, a device installs a small set of packages chosen for it.
Two consequences catch people out. A sideloaded install that is missing one or more required split APKs will fail on all Google-certified devices and on Android 10 (API level 29) or higher; downloading through the Play Store avoids this because Google resolves the dependencies. And there is a combined size limit: the compressed APKs required to install your app must total no more than 4 GB, and any later download such as an on-demand feature module must meet it too. Asset packs do not count toward that limit, though they have their own.
One limitation produces a confusing error: app bundles do not support APK expansion (.obb) files. If a size-related error appears while publishing, the documented responses are to ensure configuration APK splitting is enabled, to shrink the app by removing unused code and resources, or to move rarely used features into an on-demand feature module.
Why Google Play uses Android App Bundles
Google Play describes the Android App Bundle as the publishing format on Google Play, and the reasons are practical rather than stylistic.
Smaller downloads for users. Serving optimised APKs means a device downloads only what it needs. Google Play's own benefits list frames this as faster installs and smaller size on disk, which can lead to fewer uninstalls.
Simpler release management. You build, sign and upload a single app bundle instead of managing a set of APKs per device configuration. Google Play then manages and serves the distribution APKs.
It is the current requirement for new apps. Google Play requires new apps to be published with an Android App Bundle. This is a publishing requirement, not an option — and one more reason to understand the format before your first release rather than during it.
It unlocks advanced delivery. Publishing with a bundle enables Play Feature Delivery, which lets you modularise your app and deliver feature modules at install time, conditionally based on factors such as user country or device features, or on demand — as well as instant experiences. It also enables Play Asset Delivery for large asset packs.
One requirement surprises developers with existing apps: Google Play no longer supports TV app updates published as APKs. All TV app updates must use an app bundle.
Where the download saving actually comes from
It comes from configuration — the app ships resources for many densities, architectures and languages, and each device only needs a subset. So the benefit is largest for apps with heavy resources or many supported languages, and genuinely modest for a small app with one language and no native libraries. Google's wording is that publishing with bundles helps users install with the smallest downloads possible, not that every app gets dramatically smaller. Treat a smaller download as a likely benefit rather than a guarantee, and measure it.
How to build an AAB in Android Studio
Android Studio generates a signed bundle through a guided dialog rather than a command. The steps below follow the current official signing workflow; because the interface changes between versions, check any label that differs against the documentation.
- In the menu bar, click Build > Generate Signed Bundle / APK.
- In the dialog, select Android App Bundle and click Next. Selecting APK instead produces the other format.
- Select the module you are building.
- Specify the path to your keystore, the key alias, and the passwords for both. If you have no upload keystore yet, generate one first — that step belongs to the app signing guidance.
- Click Next.
- Choose a destination folder, select the build type, and choose any product flavours your project defines.
- Click Create.
When the build finishes, a notification offers to locate or analyse the bundle. Locating it is how you find the file to upload.
Three points that matter more than the click sequence
- Select the release build type, not debug. A debug build is signed with a debug key and is not a release. Never upload one as your production release.
- If your project defines product flavours, the flavour you choose is part of the artifact's identity. Confirm you built the variant you meant to ship.
- Signature versions are an APK-only question. The dialog asks about them only when building an APK, because bundle signing works differently.
To build from the command line, you can use either the Android Gradle plugin or bundletool. The plugin is easier; bundletool is the tool both the plugin and Google Play use underneath, and the one you need for deploying a bundle to a test device.
How to build an AAB in Flutter
A Flutter project has a real Android application module underneath, so the workflow is the same in shape — but Flutter manages part of it, and signing must be configured before the build will produce a usable release.
Flutter's documentation is explicit that on the Play Store developers upload a .aab or .apk signed with an upload key, while end users download an .apk signed with an app signing key. That two-key arrangement is Play App Signing, covered in the app signing guide; here the point is only that the release build must be signed.
The Flutter-documented sequence is:
- Create an upload keystore if you do not already have one, using
keytoolor Android Studio's key generation steps. - Create
[project]/android/key.propertiesholding your store password, key password, key alias and keystore location. Flutter warns plainly that this file must stay private and must not be committed to public source control. - Configure signing in Gradle — in
[project]/android/app/build.gradle.kts, load the properties file, add a release signing config, and point the release build type at it. - Build the bundle.
The command is:
flutter build appbundleFlutter's documentation gives the output location as [project]/build/app/outputs/bundle/release/app.aab, where [project] is the directory containing your application. Confirm the path in your own project rather than assuming it, since a custom build directory can move it.
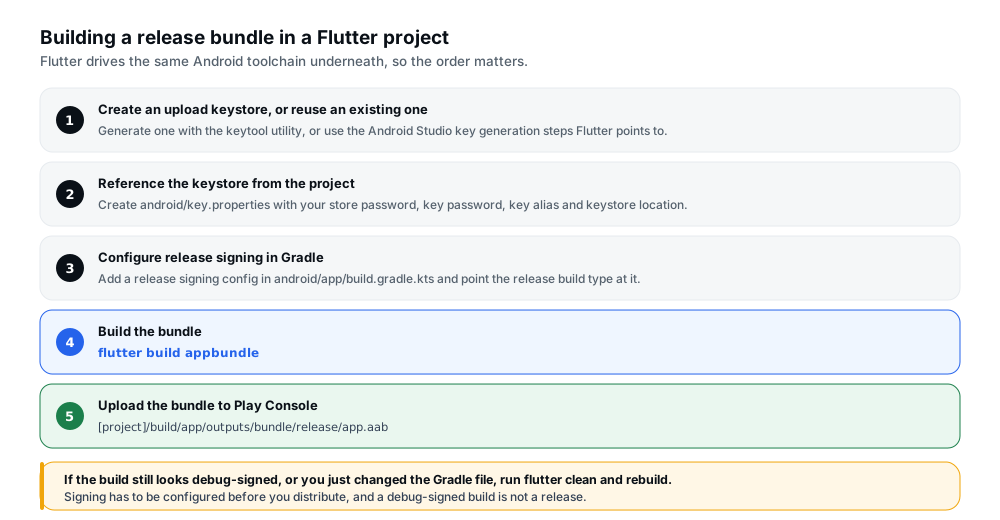
Figure 3 — Signing has to be configured before the build, not after it.
Two notes that save time. Flutter cautions that you may need to run flutter clean after changing the Gradle file, because cached builds can otherwise affect the signing result. And remember where the release version comes from: Flutter takes versionCode and versionName from the version: field in pubspec.yaml, so that is the value to raise for a new upload — see version code vs version name for the rule that governs it.
How to build or obtain an APK when you need one
APKs remain genuinely useful, and Google Play still generates them from your bundle. There are three practical routes to one.
Build a release APK yourself. In Android Studio, use Build > Generate Signed Bundle / APK and select APK instead of Android App Bundle. The dialog then also asks which signature versions your app should support.
Download a device-specific APK from Play Console. Play Console shows what Google Play generates from your bundle and lets you download device-specific APKs for a given configuration, plus a universal APK. This gives you the exact artefact a real device would receive, rather than one you built yourself with different settings.
Generate an APK set from your bundle locally. bundletool can generate an APK set covering every configuration your app supports, then deploy the right subset to a connected device — the documented way to emulate what Google Play would serve without uploading anything.
So when is an APK the right answer? Local testing on a physical device; sharing a build directly with a colleague or tester; distributing outside Google Play entirely; and producing a universal APK when you want one file that installs anywhere. What an APK is not is the file you upload to publish a new app on Google Play.
How to test an app bundle before release
Android's documentation offers several testing strategies, differing mainly in how closely they match what a real user receives. Testing through Play Console gives the most accurate picture; the local options are faster and need no upload.
| Method | What it is good for | Trade-off |
|---|---|---|
| Deploy from the IDE | Confirms the bundle builds and that the IDE can extract APKs for a connected device's configuration. | Longer builds than deploying an APK directly. Set Deploy to APK from app bundle in the run configuration. |
bundletool |
Generating an APK set, deploying the right subset to one or more devices, emulating feature-module downloads, and estimating download size for a device configuration. | Command-line work, and more complicated than running a Gradle task. Useful in CI. |
| Internal app sharing | Sharing a build quickly with trusted people over informal channels, using a URL. | Less formal than a track; suited to quick feedback rather than staged testing. |
| A Play testing track | The most accurate match to the real user experience, including on-demand feature installation, scoped to internal, closed or open groups. | Requires an upload and, depending on the track, review. The comparison of testing tracks is worth reading before you choose one. |
| Pre-launch reports | Surfacing issues automatically across real devices before you release. | Requires an uploaded release, so it supplements rather than replaces local testing. |
Choosing between the testing methods
Whatever route you choose, one check belongs in all of them: verify that feature modules are compatible with your base module, and that your app behaves as expected on a device other than the one you developed on.
How to upload an AAB to Google Play Console
The upload itself is straightforward, but two things around it are commonly underestimated: a prerequisite you must satisfy first, and the fact that uploading is not publishing.
The prerequisite. You must be enrolled in Play App Signing. Android's documentation is direct that without enrolling you cannot upload your app bundle to the Play Console. Enrollment is mandatory for new apps.
The steps.
- Open the correct app in Play Console.
- Choose the intended testing or production track.
- Create or edit a release on that track.
- Upload the signed release app bundle you built.
- Review the validation results and any errors or warnings Play Console reports.
- Verify the release details — version, release notes, track, and rollout settings — before submitting for review.
When you upload, Play Console processes the bundle and generates the distribution APKs for you. You can inspect exactly what it produced on the Latest releases and bundles page, which carries a version filter, three tabs for details, downloads and delivery, and the ability to see which devices each version supports.
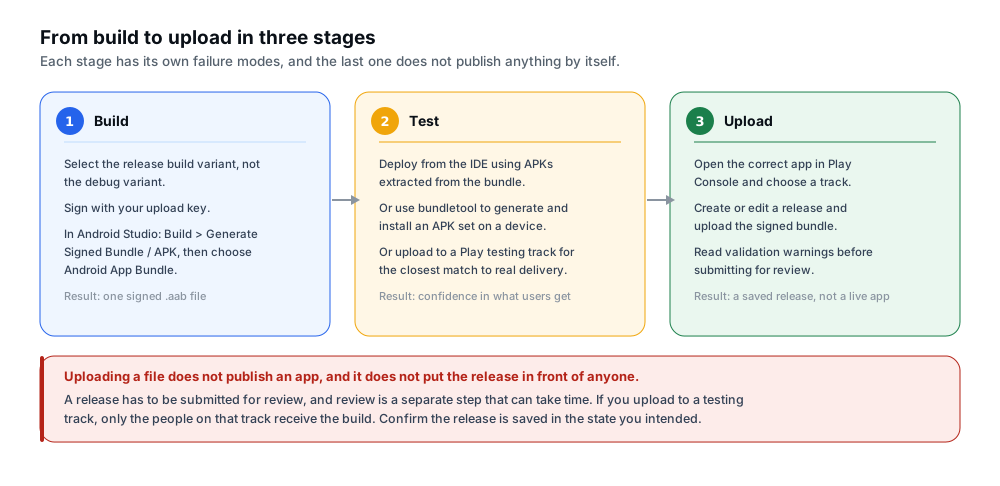
Figure 4 — Uploading saves a release. It does not publish the app or put it in front of anyone.
That last distinction deserves stating plainly, because "I uploaded it, so why is nobody seeing it?" is a common experience. Uploading a file to a track does not make an app publicly available and does not put the release in front of users. A release still has to be submitted for review, review is a separate step that takes time, and a build on a testing track reaches only the people on that track. Production access is a related but distinct requirement — see the production access application.
Common AAB and APK problems and their solutions
Table B covers the problems developers hit most often with release files. These are described as problems rather than exact error strings, because Google Play's user-facing wording varies between surfaces and changes over time — read the message your Play Console actually shows you.
| Problem | Likely cause | Safe troubleshooting step |
|---|---|---|
| The upload is rejected as unsigned or incorrectly signed. | The debug variant was built instead of the release variant, so the file carries a debug signature. | Rebuild the release build type and sign with your upload key. Never upload a debug build as a release. |
| The version code is rejected as already used or not high enough. | The bundle reuses a version code already uploaded, or one that is not higher than the current release. | Raise the version code, rebuild the bundle, upload again. A spent version code cannot be reclaimed. |
| The bundle fails validation with a configuration error. | A build property in one module conflicts with the base module's, or a tool modified the resource tables. | Read the specific error, then compare module build configurations. Documentation advises disabling tools that modify resource tables. |
| A size-related error appears while publishing the bundle. | The combined compressed download size exceeds the limit, or configuration APK splitting is not fully enabled. | Ensure split APKs are enabled for each configuration type, shrink the app, or move rarely used features into an on-demand feature module. |
An error mentions APK expansion or .obb files. |
App bundles do not support APK expansion files, so this approach cannot be used with the bundle format. | Reduce the download size using the documented options, or use asset packs or feature modules instead of expansion files. |
| Testers never receive the build. | The release was not saved or rolled out to the track, or the track is not active, or the build is already installed at the same version code. | Confirm the release is saved in the intended state, the track is active, and the version code exceeds what testers already have. |
| A sideloaded install fails on a real device. | The install is missing one or more required split APKs, which is why partial installs fail on certified devices. | Install the full APK set with the official tooling, or test through a Play track where Play resolves the dependencies for you. |
| The bundle cannot be uploaded at all, with no version or size error. | Enrollment in Play App Signing has not been completed, which is required before a bundle can be uploaded. | Complete your Play App Signing enrollment, and confirm you have the permission level needed to configure it. |
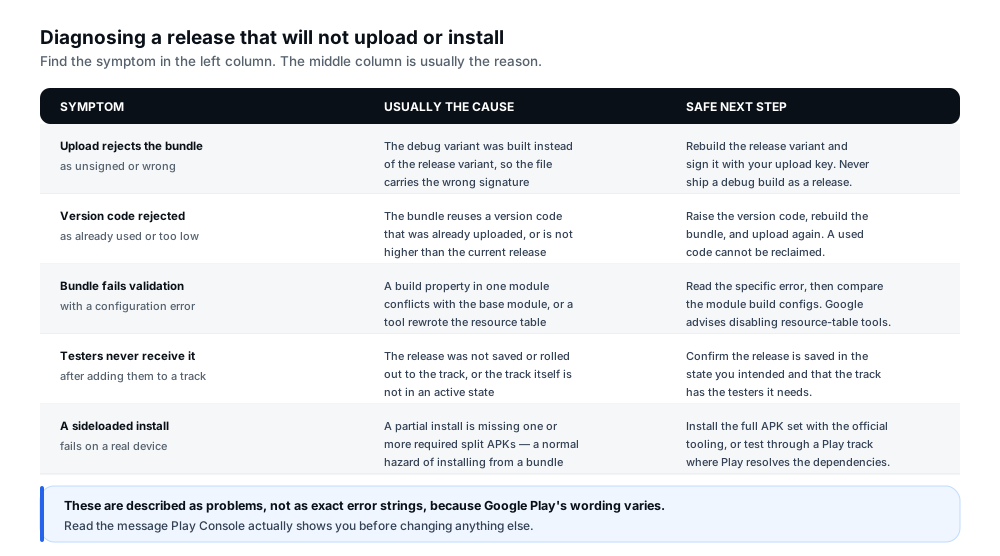
Figure 5 — Find the symptom, then read the message Play Console actually shows before changing anything.
A practical pre-submission checklist
Run through this before you submit a release built from a bundle.
- Correct app and package name. Confirm you are uploading to the app you intended — particularly if you manage more than one.
- Correct release build variant. Not debug, and the right product flavour if your project defines flavours.
- Release signing configured. A keystore and upload key are in place, and the release build type actually uses them.
- Appropriate
versionCode. Higher than every value already uploaded for this app. In Flutter, that means raising theversion:field inpubspec.yaml. - A successful AAB build. The bundle built without errors and you have located the file.
- Testing done. On representative devices, or using the official bundle-testing tools, including feature-module behaviour.
- Correct Play Console track. Internal, closed, open or production — whichever matches your intent.
- Upload warnings reviewed. You have read the validation results rather than dismissing them.
- Release saved in the intended state. Confirm whether it is a draft, saved but not rolled out, or submitted for review.
Frequently asked questions
What is the difference between AAB and APK?
An app bundle is a publishing format holding your app's compiled code and resources in modules, and it defers APK generation and signing to Google Play. An APK is the installable package format Android actually installs. You upload the bundle; users install the APKs Google Play generates from it.
Which file should I upload to Google Play?
The signed app bundle, with the .aab extension. Google Play requires new apps to be published with an Android App Bundle, and all TV app updates must use one too. You must also be enrolled in Play App Signing before you can upload a bundle at all.
Can I install an AAB directly on an Android device?
Not as a normal install. Users install APKs, not bundles. To test a bundle on a device you deploy APKs extracted from it — using the IDE's APK from app bundle deploy setting, bundletool, or a Play track where Play handles installation.
How do I build an AAB in Android Studio?
Use Build > Generate Signed Bundle / APK, select Android App Bundle, choose your module, supply your keystore path, alias and passwords, then pick a destination folder and the release build type. When it finishes, use the notification to locate or analyse the file.
How do I build an AAB in Flutter?
Set up an upload keystore, create android/key.properties, configure release signing in android/app/build.gradle.kts, then run flutter build appbundle. Flutter's documentation gives the output location as [project]/build/app/outputs/bundle/release/app.aab.
Can I still use an APK for testing?
Yes. APKs remain the natural artefact for local testing, sideloading, internal sharing and distribution outside Google Play, and Play Console lets you download device-specific APKs and a universal APK for a version you have uploaded. What changed is that an APK is no longer how you publish a new app.
Does an AAB automatically make an app smaller?
It reduces what an individual device has to download, because each device receives only the code and resources matching its configuration. The benefit depends on how much configuration-specific content your app carries — small for a simple single-language app, substantial for one with many languages, densities or native libraries. Measure it rather than assuming.
How can I test an AAB before releasing it?
Deploy from the IDE using APK from app bundle, or use bundletool to generate an APK set and deploy the appropriate APKs to a connected device. For the closest match to real delivery, upload to a Play testing track, or use internal app sharing for quick feedback.
Official references
- Android Developers — About Android App Bundles — what an app bundle is, how optimised APK serving works, the compressed download size restriction, and the known issues to be aware of.
- Android Developers — The Android App Bundle format — the internal structure of a bundle, and the base APK, configuration APK, feature module APK and multi-APK split system.
- Android Developers — Build and test your Android App Bundle — building in the IDE and from the command line, deploying with
bundletool, and the available testing strategies. - Android Developers — Upload your app to the Play Console — the prerequisites for uploading, inspecting generated APKs, and updating an app bundle.
- Google Play Console Help — Inspect app versions with Latest releases and bundles — the publishing requirement, the benefits, and how to review and download what Google Play generates.
- Android Developers — Sign your app — generating an upload key and keystore, and the signing steps in the Generate Signed Bundle / APK dialog.
- Flutter — Build and release an Android app — signing setup, the
key.propertiesfile, Gradle signing configuration, and the release bundle output location.
Conclusion
The distinction to carry away is small but load-bearing: an app bundle is a publishing format, an APK is an installable package. You build and upload one bundle; Google Play generates the APKs and serves each device only what it needs. That is why a bundle will not install when you hand it to a tester, and why an APK is not the file you publish with.
Both formats have a job. Use the bundle for everything going to Google Play, and an APK when testing locally, sharing a build, or distributing outside a store. Once that split is clear the rest is sequencing: configure signing before you build, raise the version code for each upload, test what Google Play will actually deliver rather than only what your own build produces, and read the validation results before submitting.
If you are working through the rest of the release, the target API level requirement governs whether Play will accept your upload at all, and testing across different devices covers how to build a device matrix for the testing step above.
Preparing an app for release?
12 Testers Community helps Android developers run a managed closed test with real testers who stay opted in for the full required testing period, alongside guides for the rest of the Play submission process. Your release files are yours to build and sign: no testing service can build your bundle, choose your upload key or take over responsibility for preparing a valid release, and nothing here guarantees approval, production access or ranking.